Proxmox LVM on Top of iSCSI / FC / SAS with multipathing
Multipath enables redundant access even if one or more components in a path fail. You also benefit from increased throughput thanks to load balancing. This is how it works with Proxmox.
Checking the targets
Each target is created individually here. Check the following file for each target/portal:
/var/lib/iscsi/nodes/<TARGET>/<PORTAL>/default
The following value must look like this:
node.startup must be set to automatic.
This should already be the case if you have previously configured iscsid.conf.
In this example, we have a LUN with two paths each. Two paths from the SAN and two paths from the client. Therefore, we now see the drive four times:

Configure multipath
The multipath configuration is identical for FC and iSCSI. This must be configured for all nodes in the cluster.
Installation
By default, the mutlipath package is not installed under Proxmox and must be installed later:
apt updateapt install multipath-tools
After installation, the disk can already be configured for multipath.
Identification of the WWID
We recommend the use of WWIDs to identify LUNs. You can use the scsi_id command to query the WWID for a specific /dev/sdX device.
/lib/udev/scsi_id -g -u -d /dev/sdX
Example: sdb and sdc correspond to two paths to the same LUN with WWID 3600144f028f88a0000005037a95d0001:
# /lib/udev/scsi_id -g -u -d /dev/sdb 3600144f028f88a0000005037a95d0001
# /lib/udev/scsi_id -g -u -d /dev/sdc 3600144f028f88a0000005037a95d0001
Adding the WWIDs
By default, you must add the WWIDs of all LUNs with multiple paths to the /etc/multipath/wwids file. To do this, execute the following commands with the corresponding WWID:multipath -a WWID
An example of the WWID 3600144f028f88a0000005037a95d0001:
# multipath -a 3600144f028f88a0000005037a95d0001
To activate these settings, you must do the following:
multipath -r
This only needs to be carried out once for each LUN.
Control
You can see the current status of multipath as follows:
multipath -ll
An mpath type should now also have been added to lsblk.


Notes:
- Please do not hesitate to contact us if you encounter any problems during setup.
Website: https://www.starline.de/en/support/support-request
E-Mail: support@starline.de
Tel: +49 (0) 7021 487200
- This document is based on the information status of the Proxmox Wiki as of 10.07.2025.
Please check the Wiki articles against:
https://pve.proxmox.com/wiki/Multipath
https://pve.proxmox.com/wiki/Storage#_storage_types
- The example images / example commands are from different configurations and do not necessarily have to be related to each other. They are only intended to aid understanding.
More Proxmox topics
Our experts have documented recommended configurations for virtual machines running on Proxmox VE.

Webinar on June 3 at 10:30 a.m.: Introduction to Proxmox VE administration and various setup scenarios.
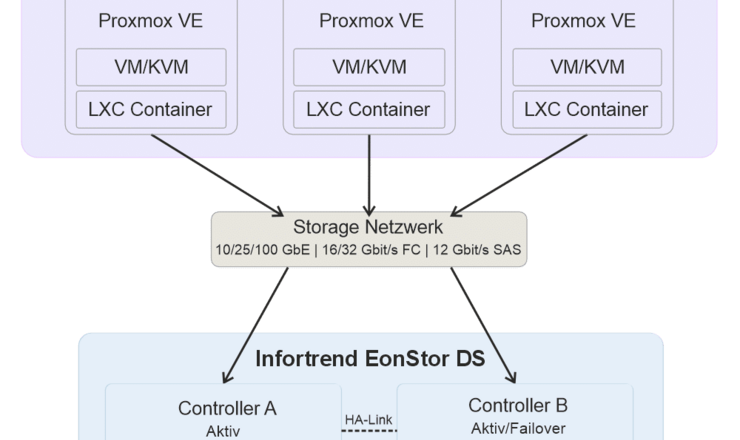
Here is a solution that allows you to use Infortrend EonStor DS as storage for Proxmox virtualization in a flexible and cost-effective way.

The Open Container Initiative has defined how containers must be technically structured so that they function the same everywhere.

Watch Starline Proxmox webinar on YouTube with English subtitles.
Here is a brief overview of the highlights: From OCI images for LXC containers to support for TPM in QCOW2 format.